What is Inkscape and Ink/Stitch?
Inkscape is a free and open-source vector graphics editor used to create vector images. Other file formats can be imported and exported. Inkscape can render primitive vector shapes and text. Using the free extension Ink/Stitch, you can convert any of these designs to be embroidered on our Brother SE 1900 Sewing/Embroidery Machine.
When you first open Inkscape, you will see a blank page. To set your page
- Click file, then Document Properties.
- Set the exact size of your page or use one of the defaults.
- Change your measurements if needed (Inches, mm, pixels, etc.) Its best to make it the same size as your embroidery hoop.
- Press the exit box to exit the screen and apply your changes
The main menu in Inkscape on the left has tools for creating shapes, lines, text, erasing, and more. The primary tool is the select tool, which resizes objects. Hovering over a tool tells you what it does.
Tool tips:
- Use the arrow to adjust and resize sides of an object. Hold shift to maintain aspect ratio.
- Press the spacebar to switch between select and the last used tool.
- Undo actions by going to Edit -> Undo.
- Convert text to a path to avoid font issues: Select text, go to Path -> Object to Path.
In the top bar, you will notice the Object tab. This will help you to rotate, align (in Align and Distribute), group, and reposition your objects. When you align your object, make sure that you align it to your page if it’s the design you want. You can also align objects to selected objects and shapes.
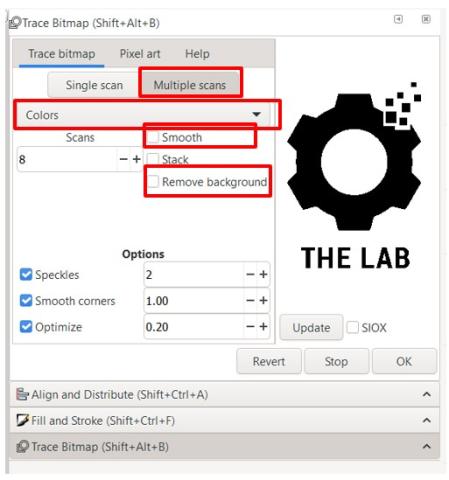
Tracing lets you to take a graphic and make it into an embroidery file. To Trace, click Path, then Trace to Bitmap. You will have several options for making your trace, such as brightness cut off, edge detection, and more. Click Help to learn more about each of these. To see how your trace will look, press update to see it. For Ink/Stitch, make sure you have Multiple scans selected. You will also want to make sure you have Colors as an option. Depending on your graphic, you may have to increase the number of scans to capture all the colors. You will want to make sure you Smooth it, plus remove the background, otherwise it will try to embroider that later. Press OK when done.
When it is done, move the original image to see the traced one. If you do not like what you see, try playing with the settings until you get what you want.
Trace Tips
- When it comes to tracing images, simple images are best, line art being the best option.
- The higher the quality the image, the better it traces (larger file size).
- Avoid small font letters, they do not often trace well. You are better using the type tool.
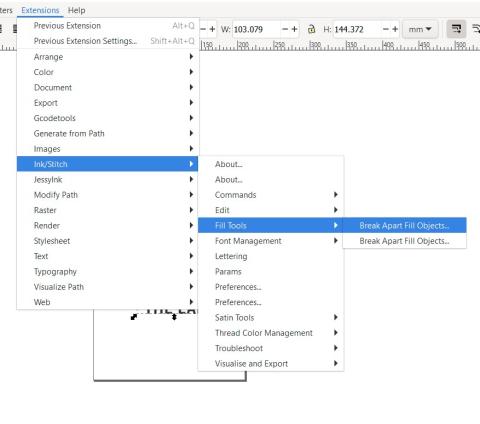
The next step is to prep it for the embroidery machine. This involves a number of steps using the Inkscape Extension Ink/Stitch. To access Ink/stick, go to the Extensions bar up top and scroll down to Ink/Stitch.
The first step you should always take is to Break Apart an object. This will prevent Ink/Stitch errors. To break apart the image, go back to the Ink/Stitch under Extensions and go to Fills Tools and select Break Apart Fill Objects.
When the pop up menu appears, click Apply.
The next step is to change the spacing between rows. This can be found by selecting Params in the Ink/Stitch Extension. When the new menu opens, the important things is to switch from the default 0.25 mm between rows to 0.15 mm between rows. This results in much better stitching. Press Apply and Quit to apply it to your stitch.
Simulator/Realistic Preview
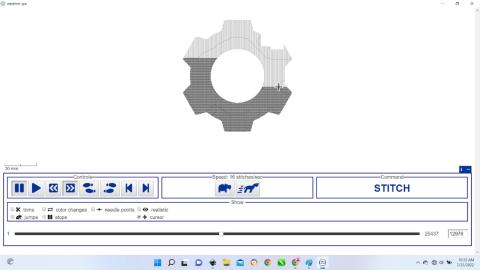
Now we are almost ready to save it as an embroidery file, but it helps to see how the stitch will go. To check this, go to Visualize and Export and select Simulator/Realistic Preview.
Once rendered, it will go through the entire embroidery process, showing you the paths and time it will take and how many stitches. Note, if you have more than one color, it will show you when those colors changes as well. This is a good way to check and see if everything is laid out correctly or if changes need to be made.
If all looks good, you should now save your file to be loaded into the embroidery machine. First go to File in the tabs, then Save As. The file type you want to save it as is an Ink/Stitch: Brother Embroidery Format (.pes). You can then take this file and embroider it with our Brother SE 1900 Sewing/Embroidery Machine.
To embroider in The Lab, you have two options. The first is to fill out our Book a maker form online. Make sure to include what you would like to do and what materials you are using or need to purchase. When you arrive for your appointment, make sure to bring your .pes file to be embroidered and any materials you need. You will pay for the item after it is completed if you use our supplies at the circulation desk. The price $0.05/1000 stitches. Both Ink/Stitch and the Brother SE 1900 Embroidery machine will tell you how many stitches will be used.
The second is to visit The Lab page at https://www.phpl.info/services/the-lab and selecting Equipment Reservations. One of the options is to select the Brother Embroidery Machine. Here a full calendar will appear. Fill out the form and set your reservation.
To learn how to use the Brother SE 1900 Embroidery Machine, be sure to sign up for our program Embroidery @ the Library!


