Embroidery at Your Library
Our embroidery machine, the Brother SE1900 Sewing and Embroidery Machine, can be used inside the Lab. It has 138 built in designs and 11 embroidery fonts perfect for monogramming. It includes a 5 x 7 embroidery field (plus others we have). It also includes 240 built-in sewing stitches. We have thread for purchase or you can bring your own.
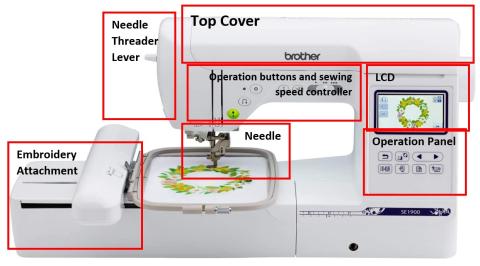
Top Cover: covers to spool pin and bobbin winder. The inside cover includes list of stitches. You will also start threading here.
LCD Screen: Settings for the selected stitch and error messages appear here.
Operation Panel: Select and edit stitch settings or other operations of the machine.
- Back
- Presser Foot/Needle Exchange: Press this key before changing the needle, the presser foot, bobbin thread, etc. This key locks all key and button functions to prevent operation of the machine.
- Previous Page and Next Page
- Utility Stitch: Press this key to select a utility stitch or decorative stitch.
- Embroidery: Press this key to sew embroidery.
- Settings
- Help
Operation buttons and sewing speed controller: Use these buttons and the slide to operate the machine.
- Start/Stop button: Press the Start/Stop button to start or stop embroidery. The button changes color according to the machine’s operation mode. Embroidery is Green
- Needle position button: Press the needle position button to raise or lower the needle. Pressing the button twice sews one stitch.
- Thread cutter button: Press the thread cutter button after sewing is stopped to cut both the upper and the bobbin threads.
- Sewing speed controller: Slide the sewing speed controller to adjust the sewing speed.
Embroidery Attachment: Where you will attach your embroidery hoops. Can be removed for different projects.
Needle Threader Lever: Use the needle threader lever to thread the needle automatically
Needle: The selected needle for the project
Bobbin cover/bobbin case: Remove the bobbin cover and then insert the bobbin into the bobbin case
On/Off Switch: Located on the right side of the machine
Presser Foot Lever: Raises and lowers the presser foot. On the back of the machine
Additional Supplies: The Lab has a number of supplies available which include embroidery thread, embroidery hoops backing, adhesive spray, alternate needles, bobbins, and more.
- Press the Needle position button once or twice to raise the needle.
- Press the Presser foot/Needle exchange key. The screen changes, and all keys and operation buttons are locked.
- Slide the bobbin cover latch to the right and remove the bobbin cover.
- Hold the bobbin with your right hand with the thread unwinding to the left, and hold the end of the thread with your left hand. Then, with your right hand, place the bobbin in the bobbin case.
- Lightly hold down the bobbin with your right hand and then guide the end of the thread around the tab of the needle plate cover with your left hand.
- The thread should be passed through the bobbin case as indicated by marks around the bobbin case.
- Once thread is in position and you can feel tension, cut the thread with the cutter
- Reattach bobbin cover
- Press the Presser foot/Needle exchange key. This will unlock the machine for further use
- Raise the presser foot lever to raise the presser foot (located on the back of the machine)
- Open the shutter, remove any thread, then place the spool of thread onto the spool pin.
- To properly load your thread, follow the number guides listed on the SE1900
- While holding the thread lightly with your right hand, pull the thread with your left hand, and then pass the thread behind the thread guide cover and to the front (1).
- Then pass the thread under the thread guide plate, and then pull it up and around (2).
- Pass the thread through the thread channel and loop around the 3.
- In section (4) there is a level that it has to hoop through. While the presser foot is up, you will be able to see it. Make sure you loop it in there.
- Then bring the thread down to 5 (near the needle)
- Slide the thread behind the needle bar thread guide (6). You should feel it when it does.
- Pull the end of the thread to the left, then pass the thread through the notch of the threader thread guide a, and then firmly pull the thread from the front and insert it into the slit of the threader thread guide disk marked 7 all the way.
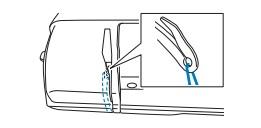
- Then pull it up to the thread cutter on the left side (8) of the machine and cut it.
- Lower the presser foot lever to lower the presser foot.
- Lower the needle threader lever (9) on the left side of the machine until it clicks, and then slowly return the lever to its original position.
- Then pull thread through the needle (you can also do this on your own and skip step 7-9)
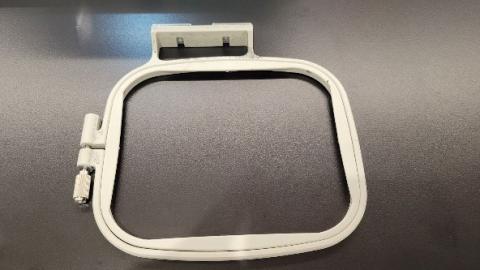
To load your item into the machine, it must first be put into an embroidery hoop. We have many sizes (7 inches × 5 inches is the standard size). But we have other larger and smaller sizes to fit your needs.
- Loosen the embroidery frame adjustment screw
- Separate the inner and outer frames. The outer frame is the larger one with the screw.
- Take backing from the supply cabinet and cut it to size.
- Take the adhesive spray and shake it
- Spray the back of your item to be bonded
- Place your item onto the backing and press them together and let it dry
- Once the backing is attached, load your material into the outer frame, then press the inner frame in from the top of the fabric
- Line up the triangle on the inner frame and on outer frame.
- Then use the screw to tighten and secure the top and bottom together. Use a screwdriver to increase the tightness.
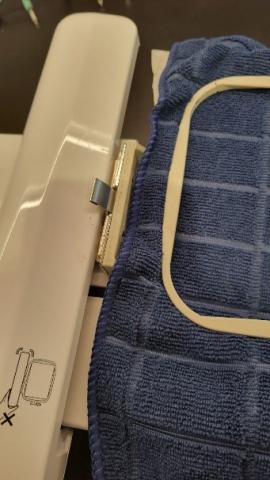
- Place the hoop unto the mounting brackets located on the Embroidery Attachment (Shown right). This should be removed from the machine. Align the two pins on the embroidery frame holder with the mounting brackets on the frame, and then press the frame into the embroidery frame holder until a click is heard.
- You can remove it from the brackets by pressing the level and pulling it off
To attach the Embroidery Attachment to the SE1900, raise the presser foot, then slide it into place, making sure to insert it into the location shown. If you have a large item to be embroidered, make sure it does not get bunched up underneath the foot. You are now ready to begin embroidering.
- Now turn on the machine using the switch on the side. The screen should jump to the brother logo. Press the screen.
- A warning should pop up that the Embroidery Attachment will move (or a warning to raise the presser foot lever if it hasn’t already been). Press OK. The embroidery unit should begin to move.
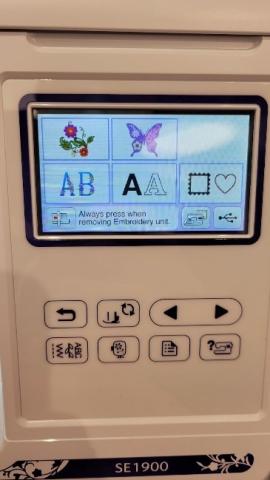
- A menu will now appear (shown right). The first 5 options are all pre built designs. You can press each one to see what they offer. Use the left and right arrow keys to navigate, and the back button to return to a previous menu.
- To use a premade design, load your flash drive directly into the USB slot in the side of the machine.
- Then, press the USB button on the menu in the button right corner (highlighted by the red box).
- Scroll through available designs with the arrows. Tap the screen to select your pattern.
- When you press it, the screen will tell you the size of the print and what hoop options are available for your design. If one is crossed out, your design is too large for it.
- If you tap the embroidery looking symbol in the top right corner, you will see how it will look on the hoop. Use this for how you place your design.
- Press OK to return to the previous screen
- Press Set to move to the next step
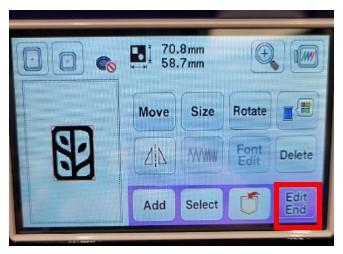
- On this menu you have a number of fun options. These include Move (lets you move items), Size (resize things) Rotate, Thread color (change the color of selected thread) and more. Press OK to make your changes in each setting.
- Once your edits are done, press Edit End (highlighted in red)
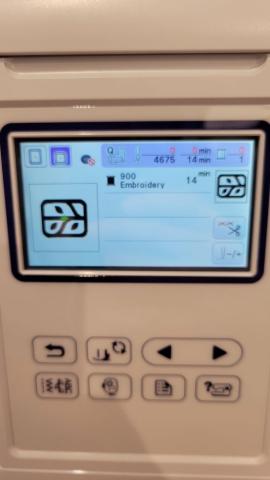
- The next menu shows you your pattern, how long it will take to embroider, and how many stitches are being used. If you had multiple colors, it will show a breakdown of how long each color will take.
- To start embroidering, lower the presser foot and then hit the green button. The machine will begin to embroider your design,
- It is best to stay nearby while you are embroidering in case an error occurs or you have to change thread color.
- If you have another color(s), the machine will automatically stop. You can then change the thread. Just press the green button to continue.
- When it is done, the machine will beep and you will see a screen saying “Finished embroidery” Press OK to return to the menu.
- Turn off the machine
- Remove the hoop from the machine by pressing the release latch
- Unscrew the hoop to remove your item
- If you used our backing, tear it off
- If you used your own baking, do whatever steps are listed on the instructions for that material
- Put any materials of the Library’s away
- Take your items own
If an error occurs, you will get a message for it. Examples of errors include
- Snapped or low thread
- Snapped or low bobbin
- Total malfunction (you will have to turn off the machine)
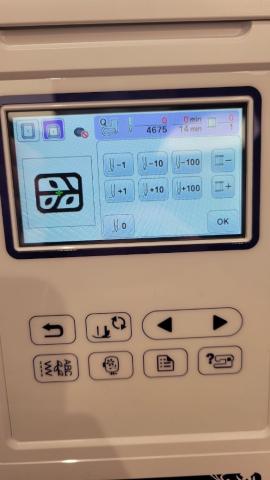
Should you encounter an issue, you will often have an option to recall the previous job. You can then use the needle position button (looks like an embroidery symbol when your design is set) to- move your needle start point to later in a job. This way you will not have to re embroider the same area. Use the buttons to increase or decrease your step count.
Note, if you do use the embroidery machine and do not have your own supplies, you can purchase ours for $0.05/1000 stitches. Both Ink/Stitch and the Brother SE 1900 Embroidery will tell you how many stitches will be used.
To pay for items in The Lab, bring them to the circulation desk.
If you want to learn about Ink/Stitch, the program for making your own designs, you can two options. You can attend the program INK/STITCH 101. If you want to have a hands on lesson with the embroidery machine or Ink/Stitch, or learn anything else in The Lab, there is Book a Maker. Fill it out with as much detail as possible and we will get back to you and schedule a meeting for your desired project.
