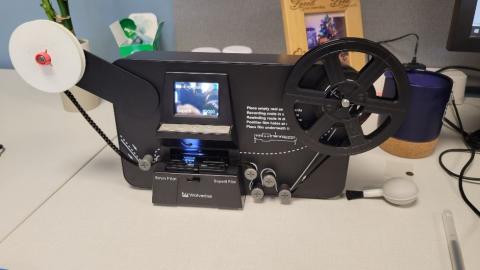
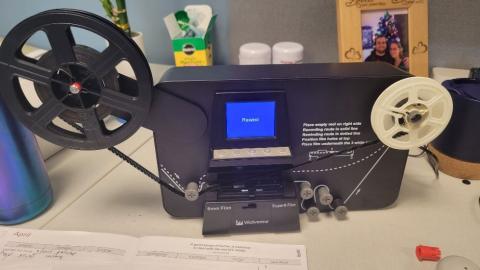
Wolverine 8mm & Super 8 Reels to Digital MovieMaker Pro Film Digitizer
The Wolverine can digitize 8mm and Super 8 film reels. It is a stand-alone machine, no computer, no software, and no drivers are required.
It scans and directly saves digital movies into SD/SDHC cards (32GB, cannot go bigger, already included in our machine.)
Converts 8 and Super 8 movies (up to nine inch reels) into 1080P MP4 digital video files that are compatible with all windows, Mac and Linux operating systems.
It includes several accessories with include a 5 inch empty film reel, a red reel adaptor, a grey reel adaptor, a brush/air pump, a USB cord, and an AV cord.
- Select either 8mm or Super8 film with the switch on front. Reference the picture below.
- Attach your film reel on the left side slot (will be colored red). Note that your film may need the red adaptor to fit properly. Make sure the film is traveling in the correct direction (same as the above graphic)
- Then, make sure the film travels underneath the first roller.
- Pop open the flap door to reveal 3 metal prongs. Position the film underneath these to key it secure. Instructions are on the Wolverine itself.
- There is a metal level that moves your film. Make sure it is sticking through the holes on your film. If it is not, it may need to be realigned or you might have the wrong film selected.
- Then wind the film on the next set of rollers as shown on the Wolverine itself.
- Attach the empty film reel to the right side slot (colored grey).
- Insert the film where it says INSERT FILM HERE
- The graphic on the next page will show it correctly loaded
- Make sure the SD card is inserted and that the machine is plugged in
- Press the Power button to turn on the machine
- Press the Menu button to open the menu.
- Use the up and down arrows to navigate different sections of the menu. Once you find the option you want, press the Enter Start/Stop button
- While you are navigating, you will see several options. These include
- Record (starts recording)
- Playback (plays previous recordings)
- Rewind (to rewind film)
- Language (to change from the English default)
- Film Type (select positive or negative film)
- and more
- Navigate on the menu to Record and press Enter.
- The Wolverine will then ask to confirm if your film type is correct (8mm or Super 8). If it is, press Enter and the recording will begin.
- The machine will start to pull the film and wind it onto the empty reel.
- Watch the screen, as it will show the current film being digitized and let you know when to stop.
- When you are finished recording, hit Enter to end the recording.
- To view your file, you can either navigate to Playback on the menu, or take out the SD card and load it onto a computer.
- The files will be placed in a folder called (FilmScanner) on the SD card and each file will have a number named based how many films the Wolverine has already converted.
Depending on the length of the reel, it can take a bit of time. I used a 3 inch one and it takes about 30 minutes. The wolverine can take up to 9 inch ones, which will take longer.
As for the files, a 3 inch reel makes a video about 3-4 minutes long and take up 200 mbs of data.
The Wolverine can also rewind your film so you do not have to by hand, saving you some trouble. To do this, you have to load the reels in reverse, with the once empty film reel on the left side and the original reel on the right. You may need the grey adapter for your reel. The film will be upside down (holes towards you), and the Wolverine has a diagram on it showing proper film placement.
Then, navigate to the menu and press Rewind. It will then rewind the film and the screen will say Rewind. This only takes a few minutes (much faster than playing it)
- If the film is stuck or not moving, the most common solution is to reload the film.
- Note, older film might have holes that have bad edges. This can produce a jittery effect.
- If film is wound too tight, it can also cause a jittery effect. Unspool and rewind the film to help loosen it
- Sometimes if you load in the SD card, it may say “Custer Size Wrong - Please Format”. This means that the SD card has a format that cannot be processed by the scanner.
To fix this, you will have to reformat your SD card by going to Format and press Yes to erase the data on the SD card. Make sure you back up any important files first because this will wipe the SD card.


